RLDev for Dummies

Hey there! Baka Taka here.
I’ve messed around with RLDev for a while now. I created an all ages patch for Winter Confetti’s AIR translation (totally not associated with them btw) and I added sprites for Suginami Mutsumi to Doki’s Little Busters translation.
They aren’t of the highest standard, and really, they were learning processes. You need those types of things to work on, because… working with RealLive is… well, you can’t just rely on the internet for it.
You know what the worst thing about the internet is? A lot of tutorials either don’t work, or are so elitist that only people who already know about the topic can understand it.
This is pretty true of RLDev. There are some tutorials… some don’t work. Some make things too complicated. Some assume that you know how to do obscure command #317. There isn’t a single tutorial that coherently informs you of what RLDev is in simple terms. You get given the basic documentation, and then you have to experiment to figure everything else out.
So… let’s fix that! Kinda…

Contents:

  1. Why RealLive?
    1.1 Setting up RLDev
  2. Working with SEENs
    2.1. Reading and Editing SEEN.TXT
    2.2. Compiling a new SEEN.TXT
  3. Graphics
    3.1 Tools
    3.2 Viewing g00 files
    3.3 Extracting g00 files
    3.4 Creating g00 files
    3.5 Creating animated g00 files
    3.6 Working with layered g00s
  4. Audio
    4.1 Tools
    4.2 Finding and extracting voiced lines in newer Key VNs
    4.3 Finding and extracting voiced lines in older Key VNs
    4.4 Adding new voiced lines to newer Key VNs.
    4.5 Listening to background music
    4.6 Converting background music .wav
  5. Instructables
    5.1 A step-by-step guide to removing H-scenes
    5.2 Editing sprites and CGs
  6. Making a Visual Novel!
    6.1 The Basics
    6.2 Branching the story with choices

Why RealLive?

RealLive is an engine that has been around for a long time. It’s like the Call of Duty engine, it doesn’t change much, it just feels a bit different every year.
There were a lot of years though. With an older copy of RealLive you can create a nostalgic work at a glorious 640x480 resolution. With a more recent copy, you can add in a baseball minigame, or recreate planetarian and put it on Steam.
The best thing though, is that it’s a genuine engine, with a crazy amount of easy-to-use tools, and a whole host of popular VNs to look at as examples. You can actually look at what the professionals did. You are working on the same things that many successful VN companies worked with in the past, and still do today. Running into similar obstacles, finding the same inspirations, and sharing similar experiences.
But best of all… it has a cool name. You don’t get that with many VN engines, do you?

Setting up RLDev

First of all you want RLDev. There are a bunch of versions, but we want the most up-to-date version and we want it to work with everything we do!
Create a folder named “RLDevSetup” somewhere on your computer. I’d go with C:\RLDevSetup\

You’ll want to follow the first two steps of Baka-Tsuki’s tutorial - Download tools, and download files. Make sure everything you download goes to the RLDevSetup folder you created.
The link for OMake might be down, but you can download a backup from here.
DON’T FOLLOW THE STEPS IN THE RLDEV SECTION.

Using 7-zip, extract all of the files you downloaded from the “DOWNLOAD FILES” section into C:\RLDevSetup\ocaml-3.09.3, C:\RLDevSetup\findlib-1.2.1, etc.

Now go back to Baka-Tsuki’s tutorial and follow all of the steps starting from “INSTALL CYGWIN + PACKAGES” up until RLDev is mentioned again.

Using TortoiseSVN (Right-click on your desktop and select “TortoiseSVN” -> “Repo-browser”) visit https://github.com/theappleman/rldev.git
Go into the trunk folder, right click on an empty space, hit checkout, and set the “Checkout Directory” to C:\RLDevSetup\RLDev
Now hit “OK” and wait for it to finish. Then close Tortoise SVN.

Go back to your Cygwin.bat and type:

cd c:/rldevsetup/rldev/src
omake
omake install

RLDev should now be installed! The tricky part is all over.
15 Likes

Working with SEENs

Reading and editing SEEN.TXT

In Cygwin, go to your game’s folder:

cd c:\Key\Kanon\

To extract the seens you then want to type

kprl -d -o seens -e utf8 seen.txt

What does all of that mean?
“kprl” runs the kprl command.
“-d” disassembles the bytecode
“-o” will set the output folder. The word you put after it will be the name of the folder the seens are stored in. We have named our folder “seens” for clarity.
“-e” will set the encoding of the text files, which can be easy to mess up. RLDev should default to utf-8, but we’ll put it in just to be safe.
The last thing you should type is the target file. We are extracting from SEEN.TXT, so type that.

If you want to learn more about the stuff mentioned above, a quick google of the terms will suffice. If you want to learn more commands then type “kprl --help” into your cmd.

After all of this you’ll end up with a folder full of scripts. With RealLive games you will always end up with two of three different types of text documents.
In older games you will be given .utf files and .ke files.
A .utf file is a resource file. There’ll be a bunch of numbers surrounded in <> and they will be followed by text. It honestly isn’t used for much.
A .ke file is the script. It’ll have the text, the sprite commands, the scene changes… everything.

In newer games you will end up with .utf files and .org files. These are much cleaner than the older .utf and .ke files.
A .utf file is still a resource file, but it is used a lot more than before. Instead of the resources being little things, all of the text in the game is set as a resource.
A .org file is the same as a .ke file without the in-game text. This is where you control the cgs, sprites, bgm, transitions, and even minigames.

We will explore all of these later, but for now just know that to create a seen file you need both a .utf document and either a .ke or a .org document.

So let’s say you change what a person says in the seen0001 file How do we get that new dialogue into the game?

If you closed cmd then you want to repeat the first step. Move to your game directory.
Getting the new script to work is as simple as this:

rlc -o SEEN0001 -d New_seens -e utf8 seen0001.ke (or .org)

This is almost identical to the kprl command we used previously, but things work a little differently.

“rlc” runs rlc.
“-o” is the name of the output file.
“-d” is the name of the output folder.
“-e” is the encoding.
And again it ends with the target file. We always target the file that controls the game - not the .utf file.

In your game directory you will now have a “New_seens” folder with a .txt file inside. Whenever that .txt file is alongside the reallive.exe you use to run the game, the custom script you created will be read!

Compiling a new SEEN.TXT

Let’s say you have a big folder of .ke or .org files ready to turn into seen files. How would you go from there to a single seen.txt file?
The command would be something like this:
for %a in (new_seens\*.ke) do rlc -e utf-8 -i c:\Key\Kanon\gameexe.ini %a
This basically means "for everything in the new seens folder ending in .ke (or .org) execute the rlc command. It also specifies encoding, and specifies a gameexe to be fail-safe. You can batch other commands in similar ways.
From there you’d do this:
kprl -a seen1.txt new_seens\*.txt
This uses the -a command, which puts stuff into an archive (think .zip/.rar files) and can also be used with the batch command feature above. It’ll add all .txt files into an archive named seen1.txt. You can then swap it with your original seen by renaming it to seen.txt.

9 Likes

You’re my hero.

This is great.

Just as I expected. Takafumi is good at this kind of thing after all! :smiley:

I’ll be following this thread~!

2 Likes

Sasuga, Takafumi.

1 Like

Taka totally made this just for me, right? Thats why he used my avatar on the cover, right? :stuck_out_tongue_winking_eye:

But no, really, this is amazing. Like, game-changing incredible. And from the looks of it, this is just the beginning of the guide. Thanks a bunch, Takafumi.

1 Like

Nah man it was for me, I tweeted him about it. www

1 Like

Yup, blame Biz.

Haven’t even got into the more obscure stuff yet~

1 Like

Graphics

Tools

When working with certain types of files, I move away from RLDev, and start using the official RealLiveMax SDK. For images, there is a set of programs to view and create .g00 files. I’ve translated the important parts of these tools, so you can download the English versions here.
Note: These tools require Adobe Photoshop to run correctly. PSD files created by different software may not work as intended.

Viewing g00 files

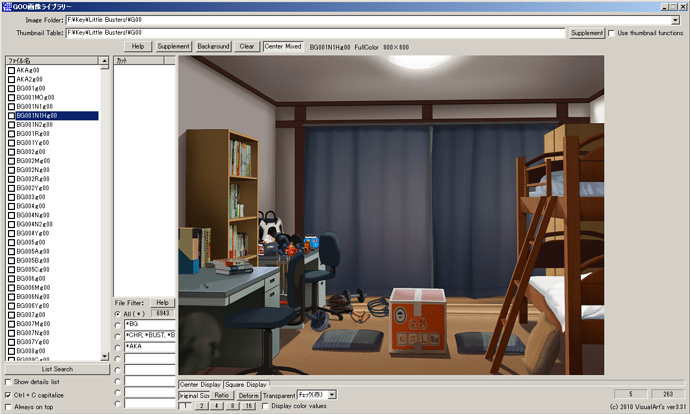
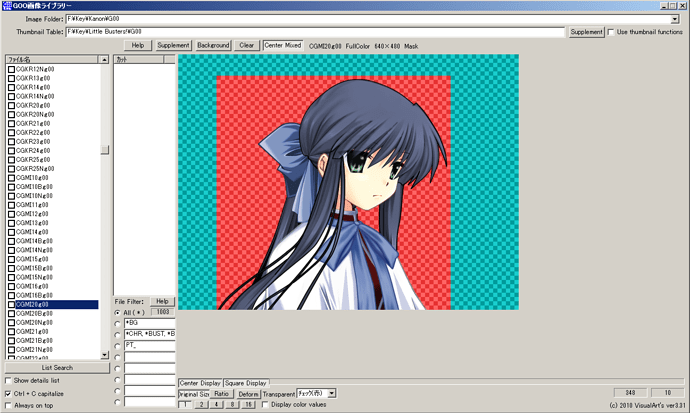
To view g00 files, you want to open G00libMax.exe. This is an incredibly simple tool, but it does everything you’d want from it and more.


At the top you have two input fields. In the topmost one you can type in the directory of your g00 images. The one below… I have no idea what it does… but I’ve never needed it, so whatever~
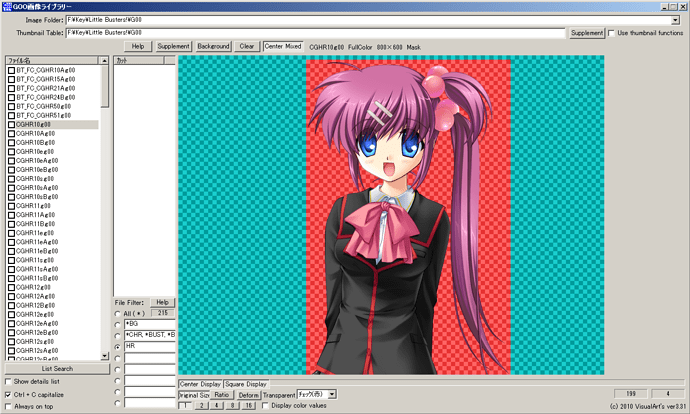
After typing in the location of your g00 files, hit the “List Search” button at the bottom left. The big column above it will be populated by the names of all the .g00 files in that folder. To the bottom right of that column is a neat little filter menu. If you type in “*AKA” in one of the fields and hit the radio button, all images beginning with AKA will show up in the big list of images.
If you typed in “hr” then all of Haruka’s images would show up in the list, along with every other image that has “hr” in the name.
This feature can be used to organize sprites, backgrounds, effects, menu buttons, and other images.
Continuing to look to the bottom right, there are a bunch of buttons. Center Display does what it says on the tin. Square Display creates a square around the area of an image, to separate it from the transparent areas.

The three buttons below that determine how the image is scaled to fit the window. Next to that is a drop menu that lets you change what the transparency and the square display look like. Personally I keep it on red and turquoise, but some images need a contrasting background~
You then get a row of buttons that adjust the zoom level of the image, and a checkbox that allows you to toggle whether color values show up on hover-over. This can be nice if you want to find out what color a part of the image is~
Speaking of hover-over, moving your mouse over the image will change the numbers on the far right. These pinpoint what width and height your mouse is pointing at (measured in pixels.)

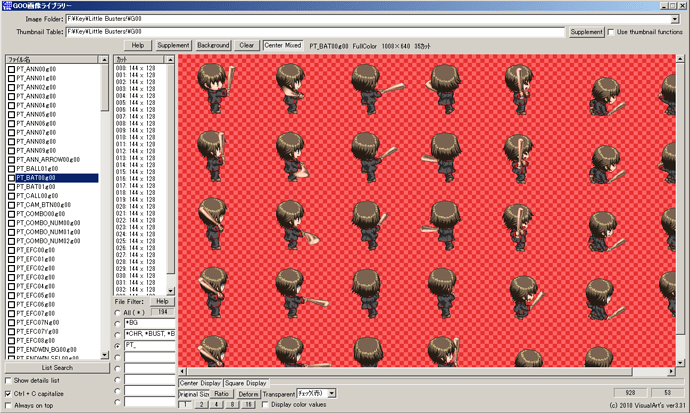
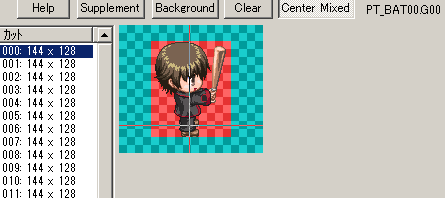
The final thing to mention is the small white column that has been empty so far. This shows plotted areas of an image. If you look at an animated image, you’ll see lots of entries in this column. Clicking on one will show the area that was plotted out.


This function is a bit of a mystery in some areas, and some elaboration on all of this will be covered in the animated images section.

Extracting g00 files

So you’ve found a g00 file, and you want to have a copy of it. Let’s say we want that Haruka sprite from above. First things first, go to your rldev folder and then into the bin folder. Copy vaconv.exe, and paste it into your Little Busters folder. Go into the g00 folder and find the image you want. “CGHR10.g00” is what I’ll grab for this example.

Copy it and paste it into your Little Busters folder.
Open CMD and go to your Little Busters folder using the cd command.

cd c:\Key\Little Busters!\

Now use vaconv to extract the g00 file.

vaconv CGHR10.g00

Check back in your Little Busters folder, and there you’ll find a png file with the same name as the g00 file.

You can do this with multiple images at a time, just add more to the cmd command.

vaconv CGHR10.g00 CGHR11.g00

Ah, but what if you want a whole folder? First, copy vaconv.exe into your g00 folder. Then, you need to go into the g00 folder in CMD.

cd: .\g00

This will move you into the g00 folder from the Little Busters folder. If you aren’t already in the Little Busters folder in CMD:

cd: c:\Key\Little Busters!\g00

Then we type:

vaconv *.g00

Similar to how the g00 viewer uses asterisks in filters, you can put an asterisk to mark it as everything with .g00 in it’s name.

Now you have a full folder of png images, with all the sprites, CGs, backgrounds, menus, and cursors from Little Busters!

Creating g00 files

So you’ve gone through the painful process of making a character sprite, or a background cg, and now you want to add it into a VN. First, it needs to be a .g00 file, so let’s get on that!

For my example, I’m going to be using some Mai sprites.

Open up Photoshop, and create a new file with a resolution equal to the reallive game you are adding images to. Kanon runs at 640x480, so I’ll make a document of that size.
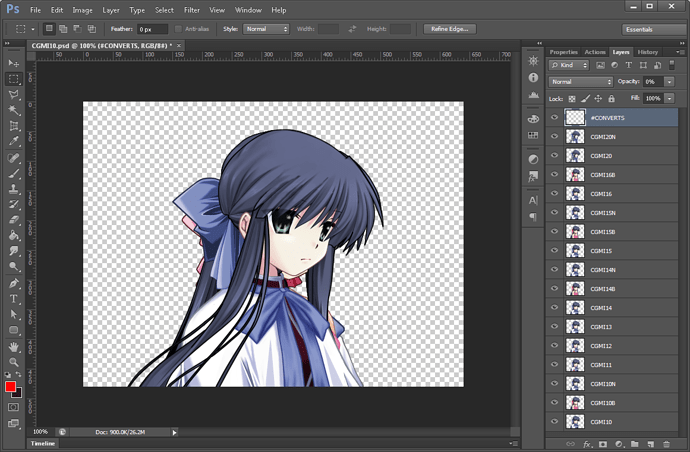
Then add your image to the document, and center it. If your sprite has multiple expressions, put each version of the sprite on a separate layer.
Now decide on a naming scheme. The names of your layers will be the names of the g00 files you end up with.
Since I’m replacing sprites, I can just use Kanon’s naming scheme.
Each layer name starts with “CG”
Then, since it is Mai, I add “MI”
Then either a 1 or a 2, depending on the sprite’s pose - facing forward is 1, facing sideways is 2.
Finally, a single digit number.

The first expression of the first pose will be named “CGMI10.” The second expression will be named “CGMI11.”
The first expression of the second pose will be named “CGMI20.”

When Mai is wearing an alternative outfit, I’ll add a letter to the end. Since she only has one alternative outfit - a dress- the dress sprites will be signified by the letter “B” at the end.

The first expression of the first pose in the alternative outfit will be named “CGMI10B.”

The same will be done with nighttime sprites, however the letter signifying it will be “N” instead of “B.”

Now that I’ve got my naming scheme sorted, I can name my layers. Come up with an easy-to-organize name!
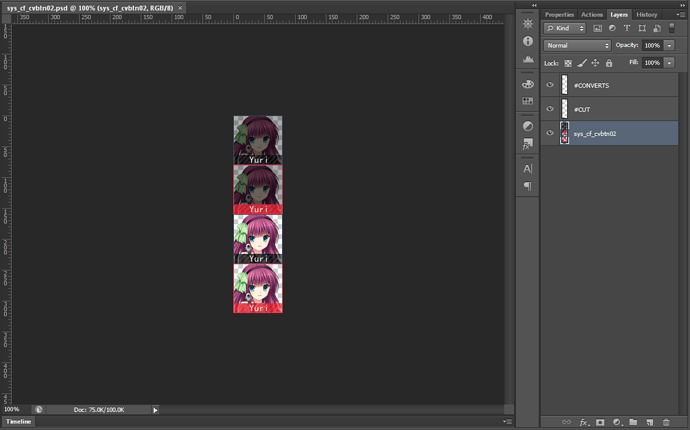
Finally, create a blank layer named “#CONVERTS” and put it above all of your layers.
Unless you only have a single lonely layer, your Photoshop should have something similar to this

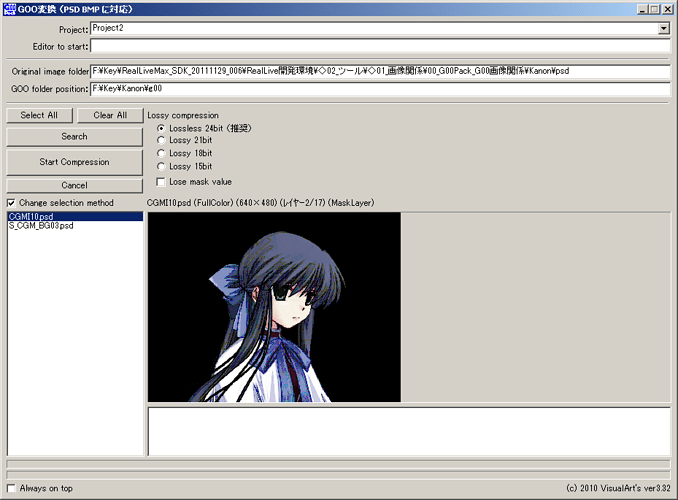
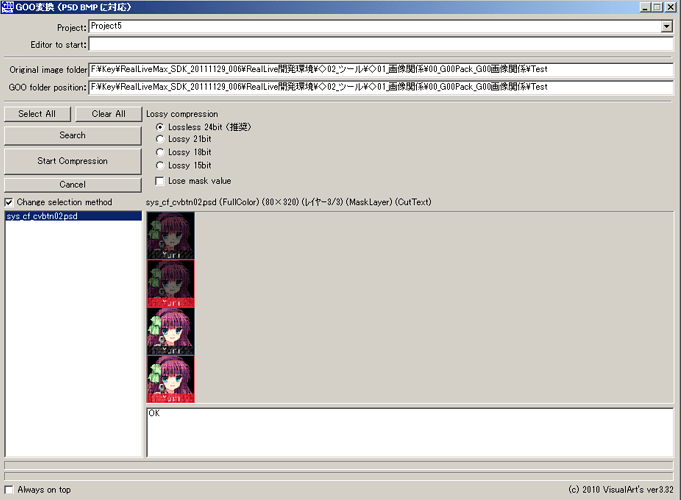
Save it to an easy-to-access folder, and find the g00 tools I provided earlier. Open up g00packMax.exe

A very simple program to use. In the “Original image folder” bar, type the location of your saved psd file. In the bar below that, type the location you want your g00 files to get saved to.
Find your psd file on the list to the left, click on it, and then hit the “Start Compression” button.
It’s done!
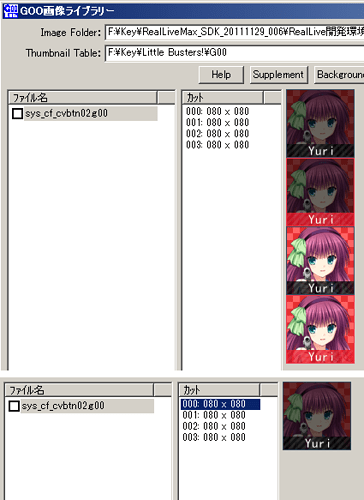
But… how do you know if it worked? Well, just follow the steps in the above section on viewing g00 files!

Tada!
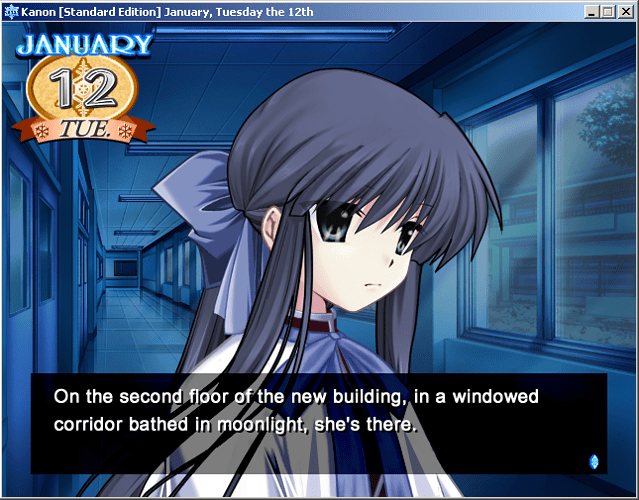
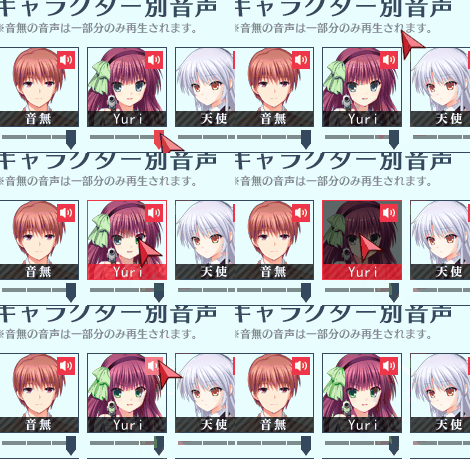
Aaaand since I replaced a sprite, I can test it out in-game straight away!

If you made a completely new image, and you want to add it into a scene, well… we’ll go over that later~ :stuck_out_tongue:

Creating animated g00 files

Note that this is an imperfect method using the reallivemax tools. For a simple vaconv method, see here.

Sometimes you want to add in a sprite sheet, or some typewriting text.
First, put all of the frames of your animation into one psd file on one layer, then add two blank layers, one named #CUT and one named #CONVERTS. Name the image layer what you want your g00 file to be called.

Now save the psd, making sure to maximise compatibility, and go to the folder that you saved the psd to. In that folder, make a new txt file with the same name as your psd, and type this:

#RECTCUT_YOKO 0, 0, 80, 80, 1, 4

This is a command that works with the g00pack program. It cuts out a specific region of the image.
The numbers are co-ordinates. 0, 0 is where the image begins. The first 80 is the width, and the second is the height. 1 and 4 are how many images I want overall. 1 = How many are in a row. 4 = How many are in a column.

Save the text file once you have filled it in with the correct values, then go over to g00pack.


Find the file, start the compression, and then check the resulting g00 file in g00lib.

Check that the co-ordinates are right, and that everything is cropped correctly, then check it in-game!

10 Likes

Can this be used to remove H-content from VNs?

1 Like

It’s conceivable that you would be able to mod the game to remove any such scenes, or replace them. The G00 stuff is just for the graphics specifically, though. So you would need to use RLDev or RealLiveMax to modify the SEEN files to change the scripts if you didn’t want to read the H-scenes.

In short, it would probably be better to just modify the game’s SEENs directly with RLDev or similar.

I can write how to do that tomorrow.
If anyone has any topics they show interest in, I’ll focus on it~

Did it with Air~ I can go over the changes I made to that.

4 Likes

Audio

Tools

For extracting voiced lines from newer Key VNs, you will want a problem named ExtractData.
For listening to background music, grab a copy of NWAlib.
For extracting background music, Puggsoy’s Video Game Sound Converter is great.
For making your music playable as a BGM track, get NWApack.
As always, you’ll want Notepad++
You’ll need a way to open .ogg files. Audacity da best?

Finding and extracting voiced lines in newer Key VNs

There’s that one line in the VN that you just HAVE to get, for a ringtone or for a random skype message or something! But… how do you find it? And how do you extract it? For my example, I’ll be looking for a one-liner by Yuiko during the girls dorm party scene from Little Busters!

First, copy kprl.exe from your rldev/bin folder, and paste it in your VN’s folder. Then open up cygwin.

A new folder will appear in your VN folder named “seen_files.” This contains the whole script for the VN.

Open up Notepad++ and hit ctrl+f.


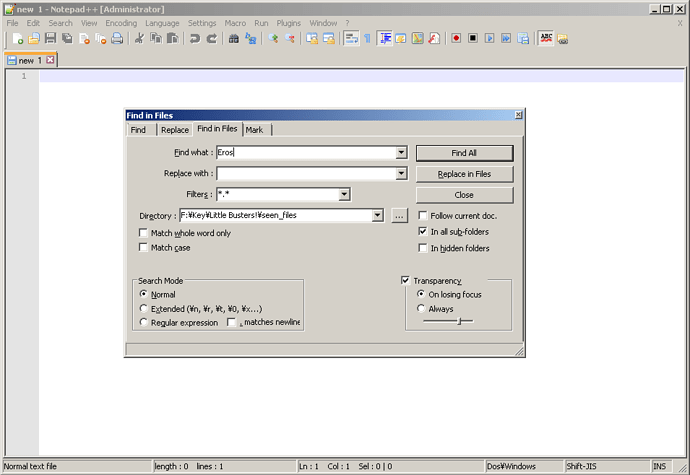
Move to the “find in files” tab, and set the directory to the new seen_files folder that was created. In the “Find what” input bar type in a word or sentence you are looking for. It could be a wafu, or an uguu, or Misuzu-chan’s in a pinch!
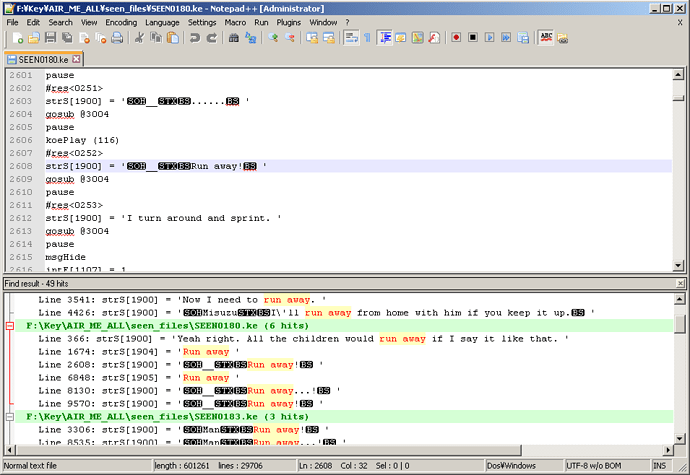
Hit “Find All” and you’ll get your results!

You may have more or less results than this, depending on how specific you were. Once you find the line, or a part of the scene you are looking for, double click it.
Search through the text and find what you are looking for. Once you have, copy the <number> next to it.

Now go to your seen_files folder and open up the .org file with the same name as the file you are reading from in Notepad++. My line was in SEEN0522.utf, so I open SEEN0522.org.
Ctrl+f again, and search for the <number> you copied earlier. Mine was <2831>.

You should come across something like this:

koePlay(52206845, 4)
#res<2831>
pause

Open ExtractData and go file>open file. Move to the KOE folder in your VN’s directory, and look for the file that matches the number in the koePlay line that appeared in Notepad++. If the number is 8 digits long, look for the first 3 numbers. If it is 9 long, search for the first 4.
Mine is 52206845, so I look for 522. I end up opening z0522.ovk.
Then I look for the rest of the numbers. “6845” are mine, so I’ll look for that.

Double click to extract it and open it. It should be what you are looking for!

Finding and extracting voiced lines in older Key VNs

Following a similar process to the last guide, you can get voices from games like Kanon and AIR. Follow all of the steps in the above tutorial, up until the point where this image shows up:

Double click the line that you want, or a line from the same scene as the line you are looking for, and it’ll open up in the top window.


Look above your line, for a “KoePlay.” KoePlay (116) is mine.
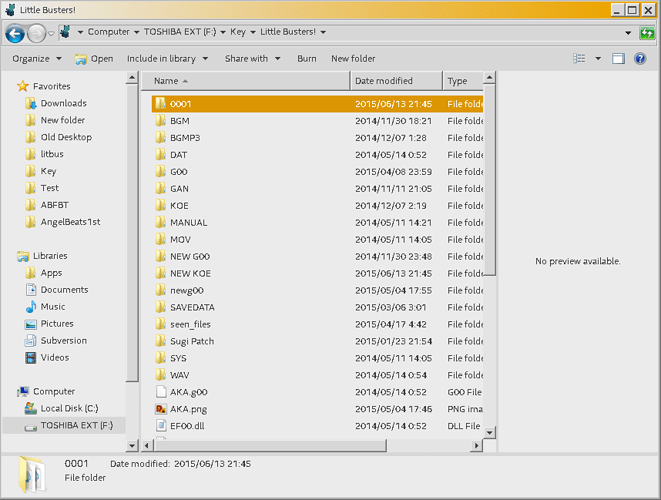
Now go to the KOE folder in your VN’s directory. You’ll be met with a bunch of folders. To find out which one you need to open, look at your KOE.
Your number will be split into two sections - The first 4 numbers mark the folder it comes from, and the last three numbers mark what file number it is. If it starts with 0101, enter the 0001 folder. If it starts with 2525, enter the 0025 folder. If yours only has 3 numbers, then you go to the 0000 folder.
Look for the file that matches the KoePlay line, and give it a listen~

Adding new voiced lines to newer Key VNs.

To start off, you’ll want to find some noise that you want to include as a voiced line. It needs to be a .wav file, so if it isn’t already, open it up and save it as a .wav file. You can do multiple at the same time too, so if you want to get a bunch of new voices in, you can.
Go to your VN’s folder, and create a new folder there named “0001.”

Inside that folder, place the .wav file(s) that you will be using as voiced lines. There is a strict naming scheme. You can easily figure out what pattern this naming scheme follows by looking through the koe folder and the .org files, however for simplicity’s sake, we’ll just name our files as such:
z000100001.wav
z000100002.wav
z000100003.wav

and so on for how many files you have.

Now, a new tool! We’ll dip into the RealLiveMax sdk and get a tool named OVKpack. As always, you can find the whole sdk through a google search, but my lazily translated version of it can be found here.
The tool needs to be set up like this:

In the top bar, you put the location of the folder that you created the 0001 folder in. Mine is at F:\Key\Little Busters!\0001, so I put F:\Key\Little Busters!
The output folder can be anywhere you find convenient. I like to put it in a dedicated folder, but you could put it to your desktop or something memorable.
Then, hit “Start Compression” and a .ovk file should be created in the output directory you specified. Copy this file to your game’s KOE folder.

Now to add it into the game. Look through your seen files (make sure you followed the “Working with SEENs” guide,) for the place where you want to add new voices.

You can use Notepad++'s ctrl+f function to search for a word or sentence in a whole folder of files, so it’s easy to find the line you are looking for. (Looking for scenes with Notepad++ is expanded on in various other parts of the tutorial. If you are unclear on the process, I recommend looking at the H-scenes guide.)

Once you have found where you want to add your voices, open up the .org file matching the name of the file you are currently reading. I have seen0001.utf and seen0001.org.

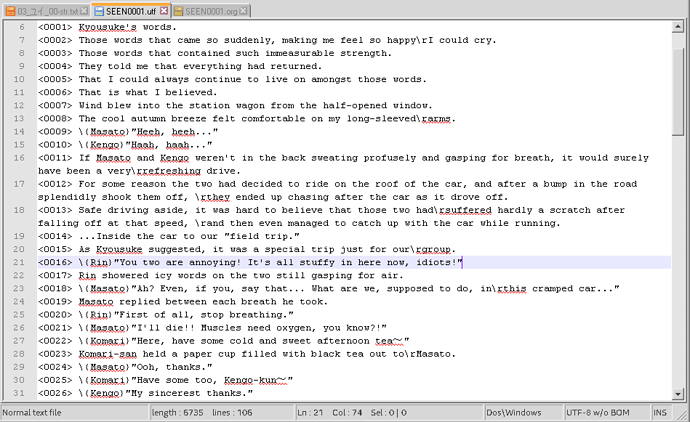
Now in your .utf file, check the number at the start of the line you want to add a voice to. I’ll use the line starting in <0016> in my screenshot - one of Rin calling Masato and Kengo idiots.
Then, look to your .org file, and search for a #res that uses the same number as the one at the start of the line you are adding a voice to. #res<0016> is mine.
Above the line that has the #res, paste this:

koePlay(000100001, 8)

The long string of numbers should match the name of the .wav file you are using.
Save your .org file. and then compile it into a seen file as you normally would. When you get to that point in the VN, your inserted sound should play.

Listening to background music

You can listen to any background track using NWAlib. It’s a simple tool to quickly check NWA files.

By linking to your BGM folder in the top bar, and your game folder in the bottom, you can see a list of all the background tracks in the VN. Clicking one will instantly make it play.
The three buttons are: Play, Stop, and Load Folder.

If you ever want to just listen to the ost from a VN, this is the program you want.

Converting background music to .wav

This is incredibly simple. Open Video Game Sound Converter and it’ll ask for a file. Look for the BGM track you want to convert and select it. Then you’ll be asked where you want the file to be saved. Just select a folder, and it’s done!

5 Likes

Instructables

A step-by-step guide to removing H-scenes

Censorship is something you need to be very careful about. Removing H-scenes has a purpose, to make it friendly for all ages, however it can be easy to overstep and censor things that don’t need to be. Removing content is something you DON’T want to do.
Today I’ll be working with Tomoyo After, an amazing VN that gets overlooked because of it’s introduction. The VN starts with lots of H-scenes, so the focus point of this project will be at the start of the VN. Naturally, if you are censoring a different VN, you will have to look into different seen files to find the H-scenes.
Oh, and this process is nsfw… so don’t do it while family are around.

I start by copying kprl.exe from my rldev/bin folder, and pasting it in the Tomoyo After folder. Then I open up cygwin.

In my Tomoyo After folder a new folder has been created named “seen_files.” In that folder is the script to Tomoyo After.
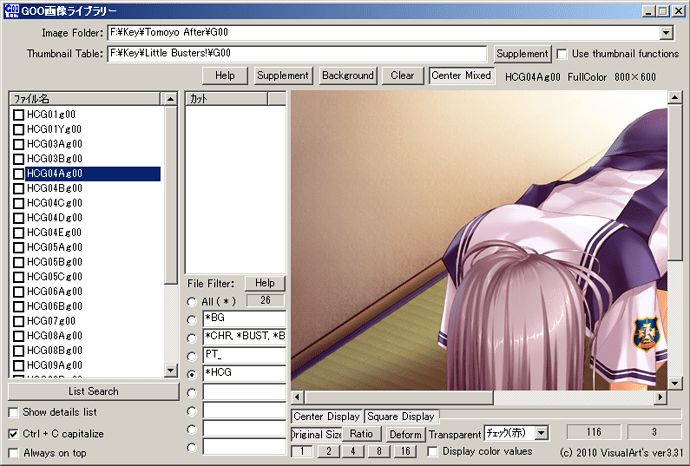
Then, following the steps in the “viewing g00 files” tutorial, I open up g00libMax.
For most VNs, you will have to search through all of the CGs for the HCGs. Luckily Tomoyo After was so lazy with it’s fanservice that all of the HCGs are labeled “HCG.”
Once you’ve figured out the naming scheme for CGs in your game, you can single them out with a filter.

Now my favorite tool for editing seen files - Notepad++
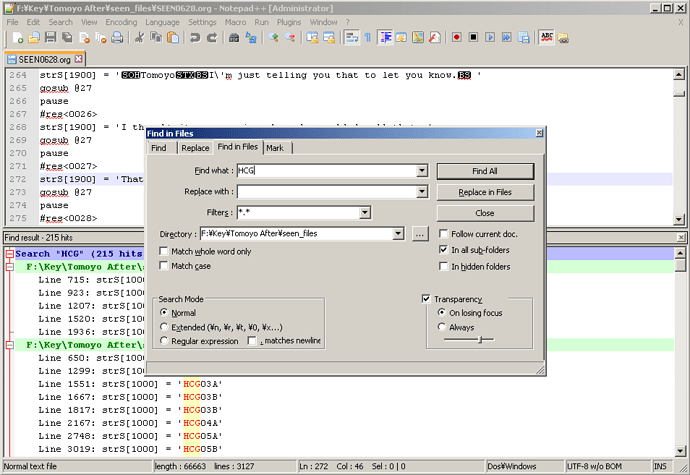
I open up Notepad++ and press ctrl+f. This opens up a find menu. I click the “find in files” tab, and then type in the name of a HCG g00. I set the directory to my Tomoyo After folder, and begin my search!

You can see all the results in the bottom half of Notepad++. Double clicking a line will bring it up in the top half.
We can now read through the scene leading up the the h-scene, and we can look through the VN and see what exactly is going on.

Now, I have a bit of a dilemma. The H-scene I’m working with has some character development.
Luckily, the lead up to the H-scene starts with a fade-from-black. We can just move the development to a more suitable place, such as before the fade-to-black happens.

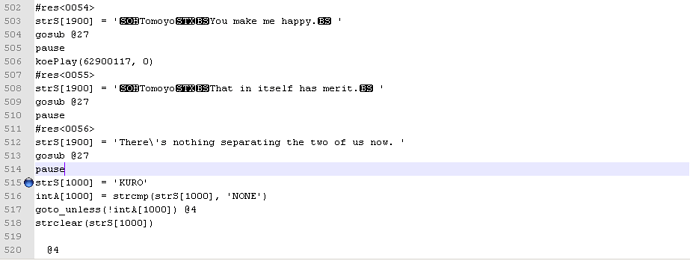
So now I look for a nearby “KURO” in Notepad++. This is the fade to black. I click on the line number, and set a mark to remember where the line is.

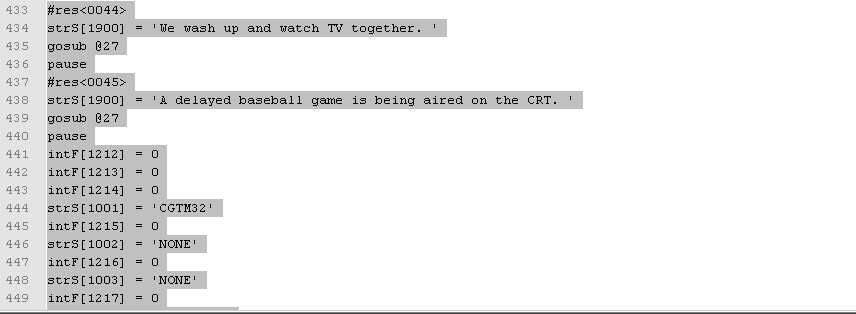
I highlight all of the character development starting from #res<0044> and ending with pause.


I then paste that just above the KURO line.

Finally, you might want to delete the KURO line depending on how your scene continues. Generally you will figure this out as you play test your completed seen file.

There we go! All the important stuff is safe from censorship. Since I have a fade-to-black, there is a new section of script right after it. This is marked by an @4 at the top. I keep all of the bits with “NONE” in, and find two lines near the bottom of the NONE section.

SET_WAIP_WINDOWCLOSE_OFF
SET_GRPCOM_WINDOWCLOSE_OFF

Everything after that until the H-scene ends gets deleted, making sure to follow it up with the #res of the text right after the H parts of the H-scene have ended.
If there is no important text right after the H-scene, you can just delete the whole thing up until the next @number section.

Now I alter some of the text to fit in a non-H context, and the scene is done. Now I save the file in my Tomoyo After and go back to my “seen_files” folder.
I copy the .utf file with the same name as the seen I edited, and paste it into the Tomoyo After folder.

Now I go back to Cygwin and type:

rlc -o SEEN0628 -d new_seens -e utf8 seen0628.org

This compresses the file so that the VN can read it.
However…

An error! I’ve deleted something I shouldn’t. Hopefully your seen compresses fine, but if you get an error like this, you have to go back to notepad++ and find the error.

Line 386 is where I moved the non-H content to. The error?

I accidentally put “pause” and “#res<0044>” on the same line! A press of the enter key, and everything is fixed.

Now I can go into my “new_seens” folder and move the new seen file into my Tomoyo After folder.
Now you can test it! Delete that fade to black if you need to, and make sure everything is coherent and with the correct sprites… Or just listen to the beautiful title music of your VN. That is nice to do as well.

If you have a copy of Tomoyo After, and would like to see the result of this step-by-step, you can download the seen file here. The whole of the first day will be censored, and you can see the results within a minute of starting a new game.

5 Likes

Do all VNs have a special naming for the HCG?

Not usually. Tomoyo After is just convenient :stuck_out_tongue:

In most VNs they will be with the rest of the CGs. CGs are normally marked with FG at the start, so you can look through them.
In Kanon for example, FGNY12 will be the first Nayuki HCG. FGMG08 will be Minagi’s first HCG in AIR.
The main Key games will follow this pattern.

Unfortunately to remove the H-scenes you have to see them partially ^^;

I’m having some problems installing FINDLIB. It says “ocaml not in PATH; this is required”. Any idea of what happened? I followed all the instructions, expect the ones you said not to follow.

Hmm… did you follow all of the OCaml installation steps?

Oh, and what Operating System are you running?

I followed them. But the problem is fixed now. I have no idea what this means, but I found it somewhere in the internet: I typed export GNUMAKE=gnumake, and then, export gnumake=gmake